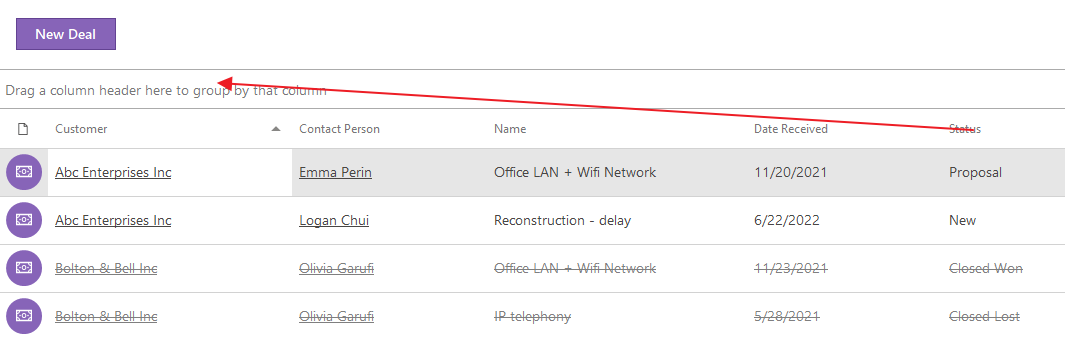
Create Grid Reports
Create custom layouts to have data always at hand.
Tutorial for
eWay-CRM Online
- Save Views
- Share Views
- Adding and Removing Columns
- Sorting Items
- Items Filtering
- Quick Searching
- Grouping of Items
- Grouping of Items
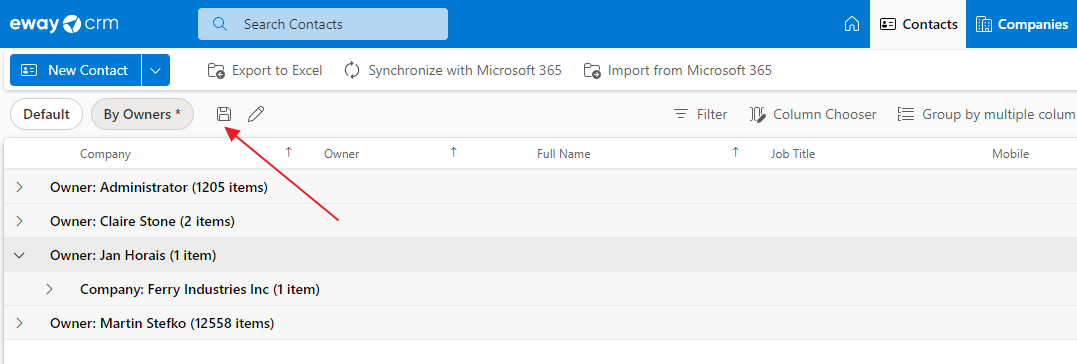
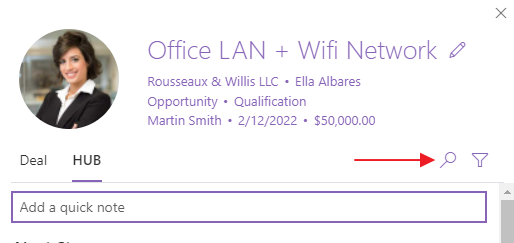
Save Views
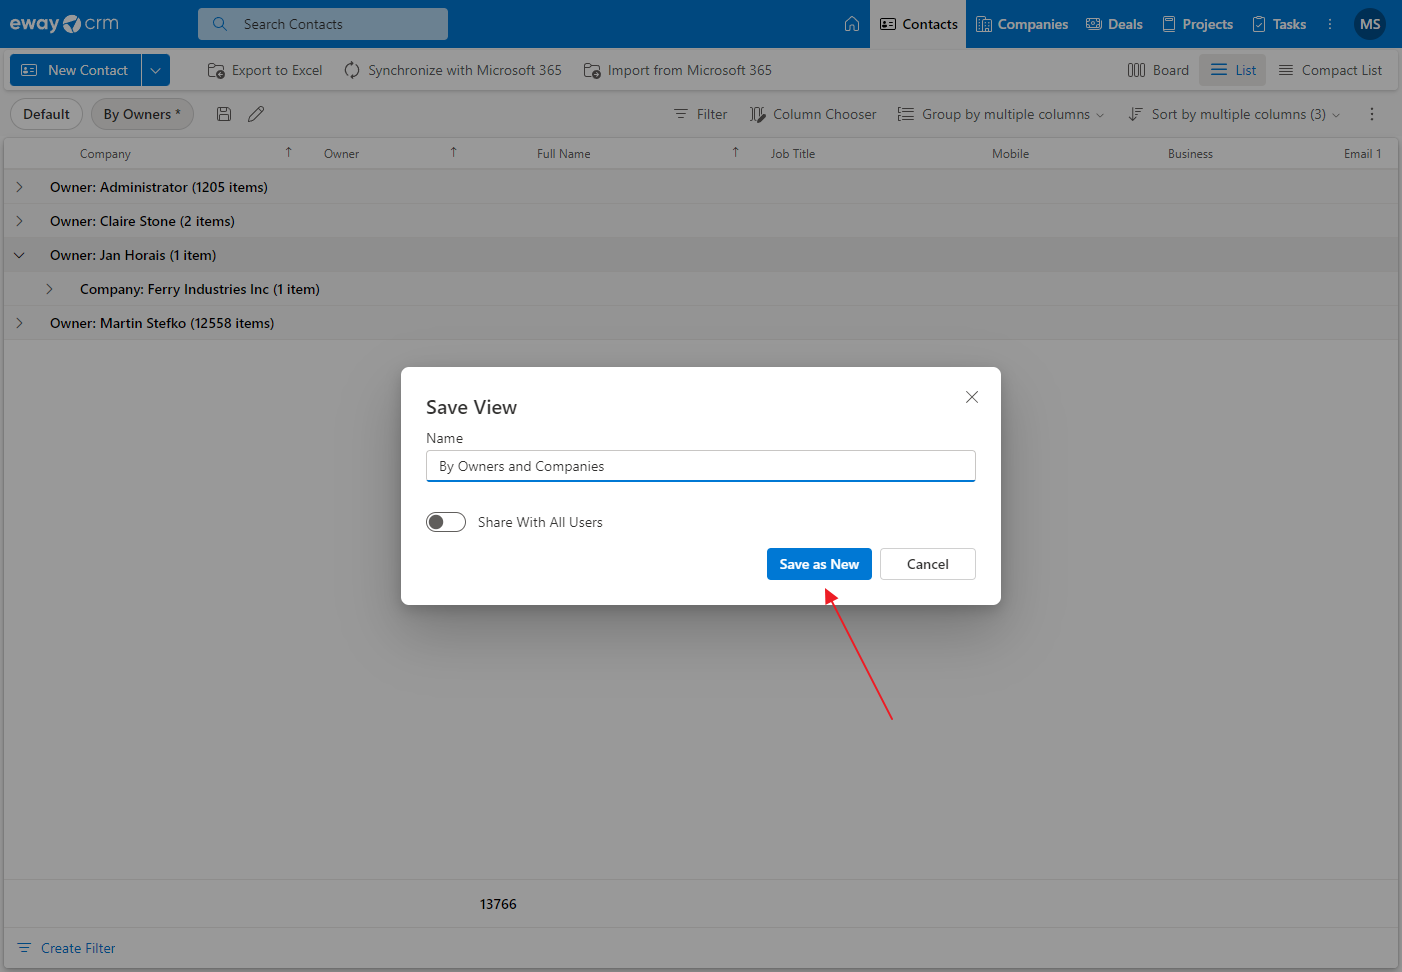
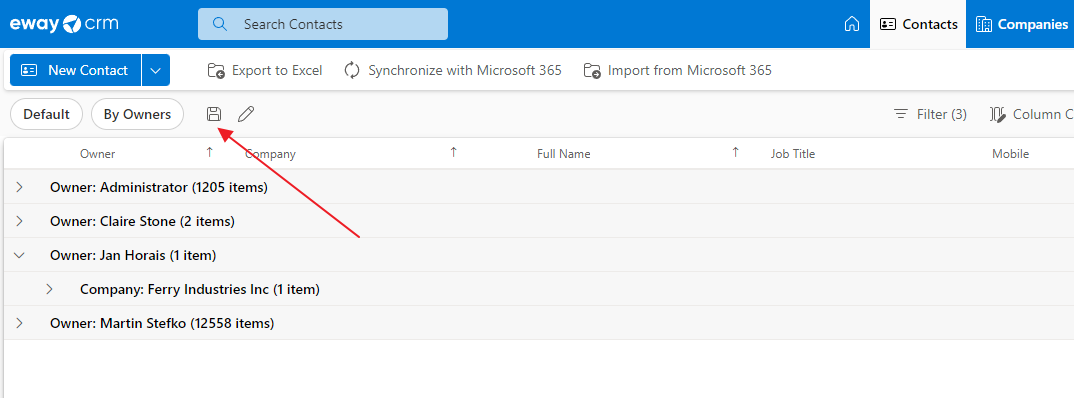
- Set columns and filters on a list as required (see below). Then, click the add/save icon.
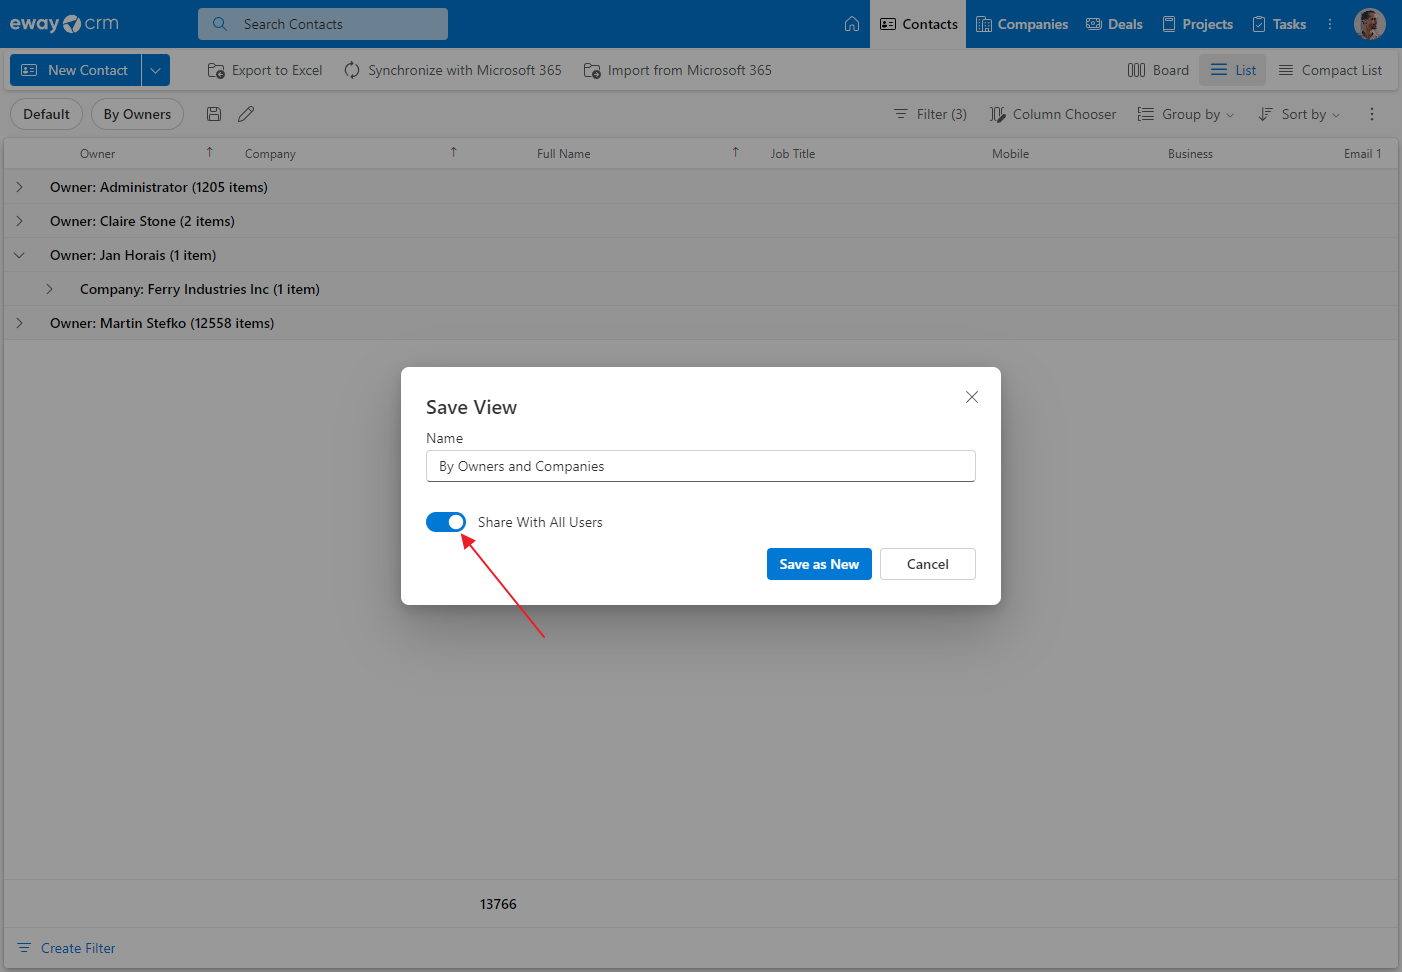
- Name the view as you need and save it by clicking Save as New.
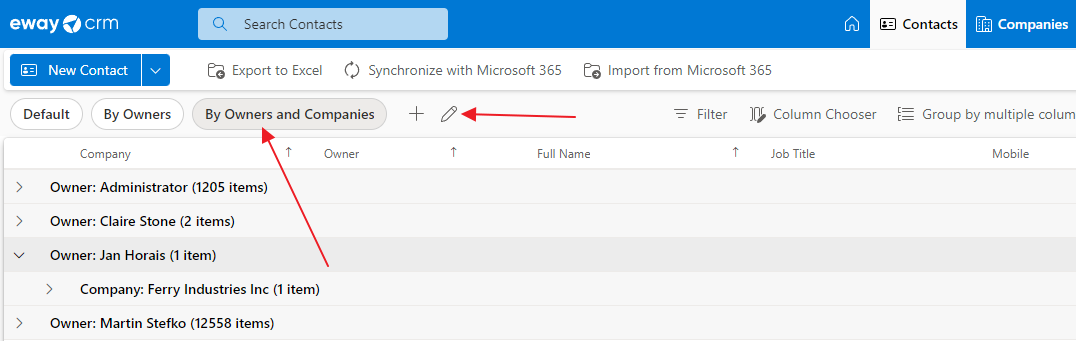
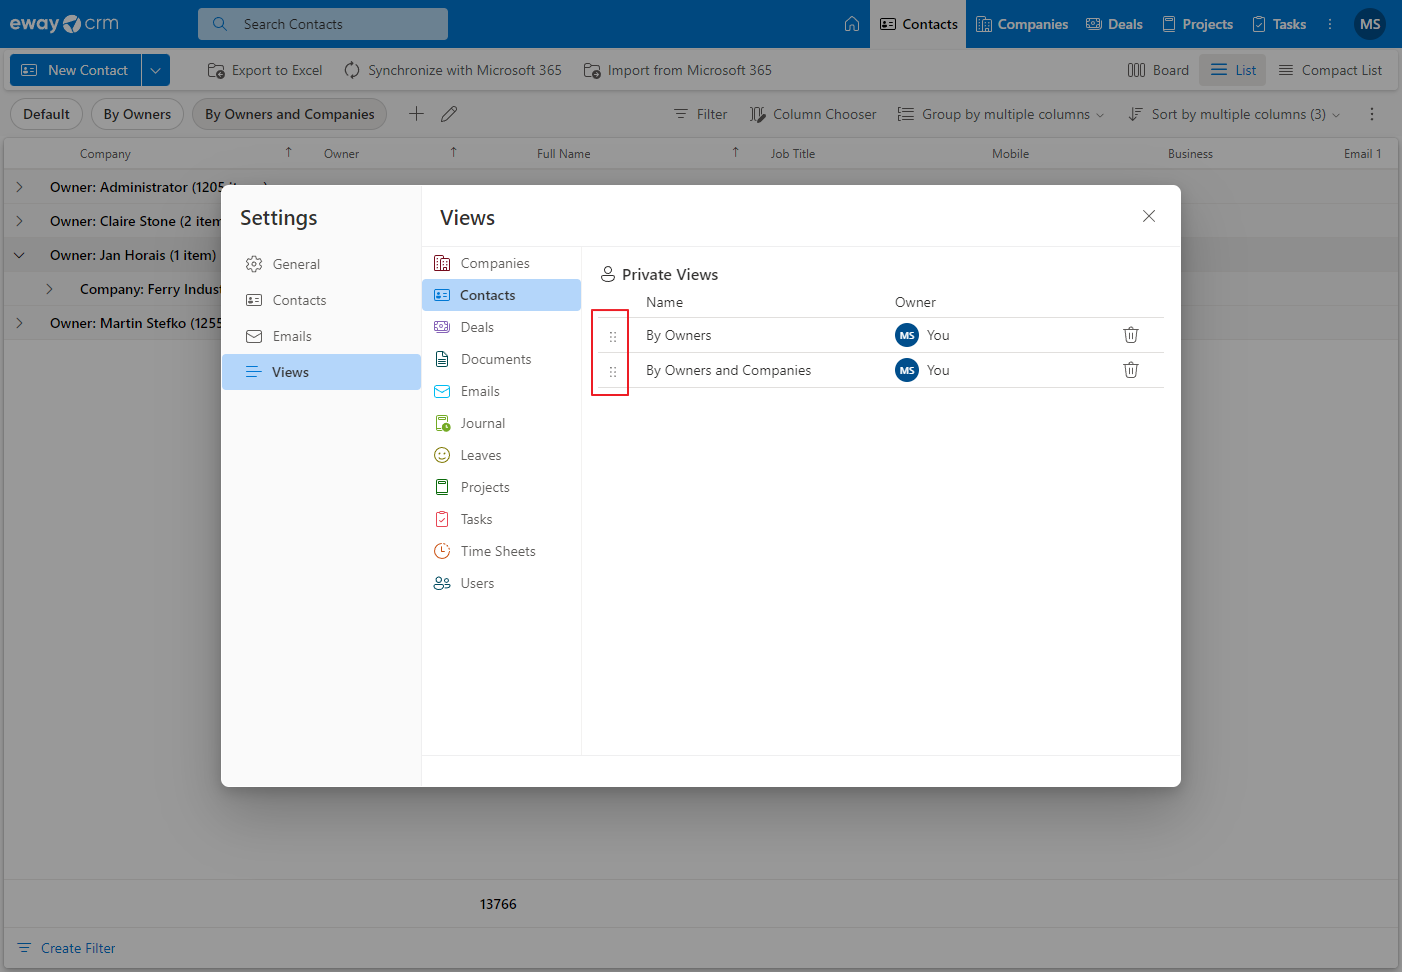
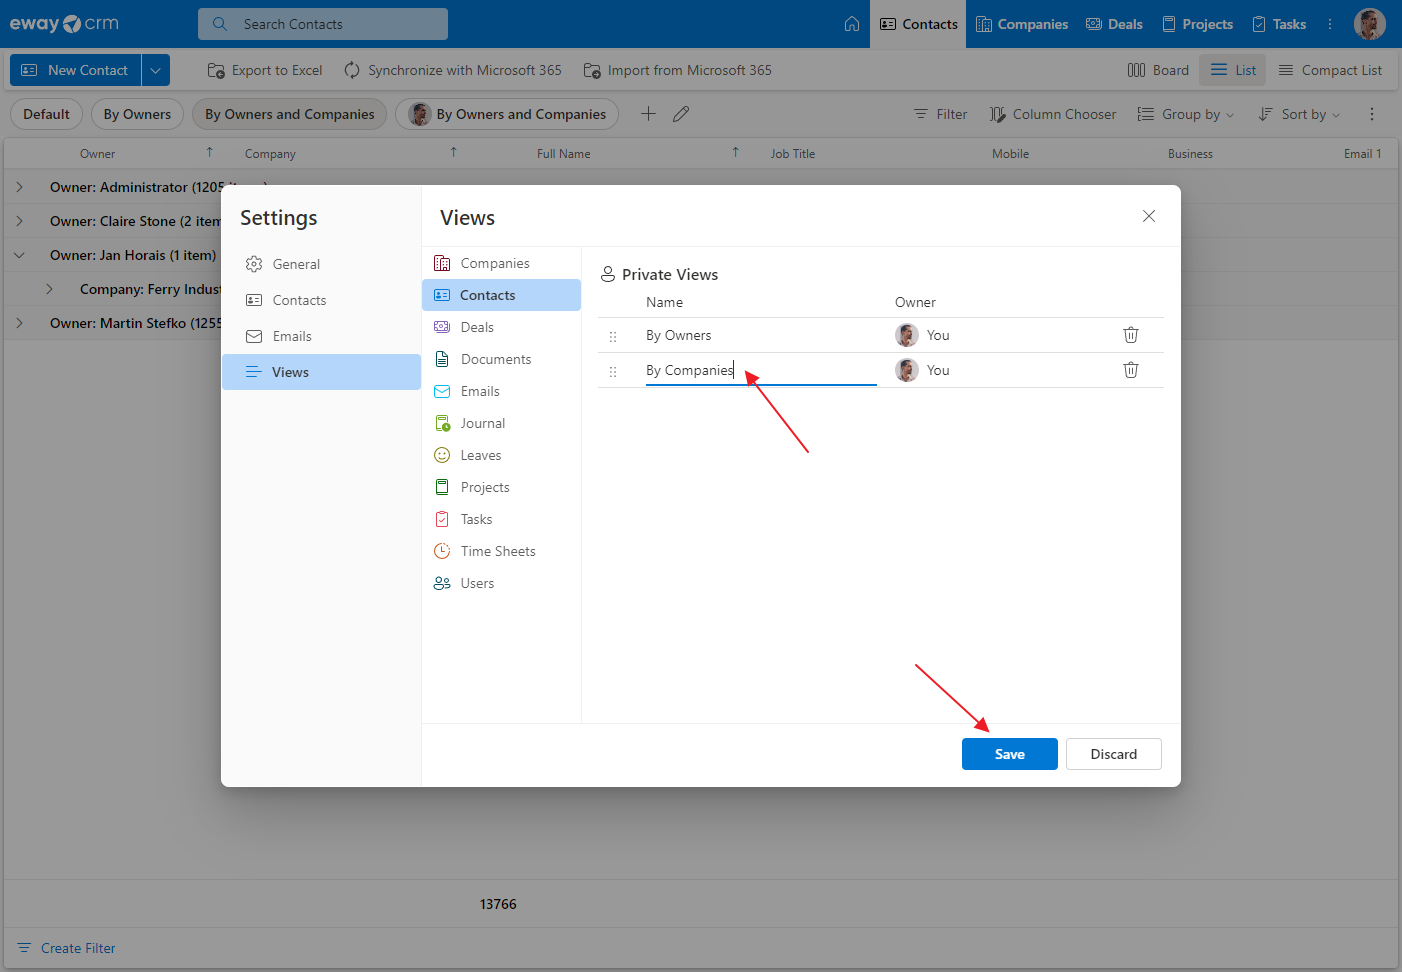
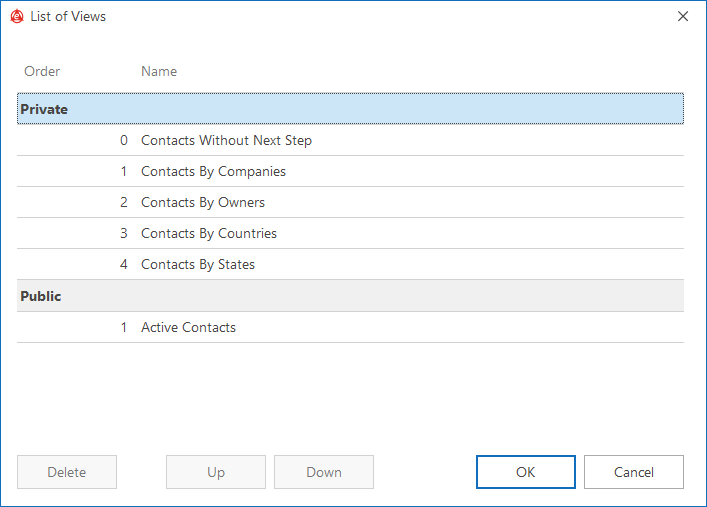
- The view is saved and is available only for you. If you want to see all views and manage them, click the pencil icon next to views.
- You can move views in the list. Just, click the 3×3 dots icon and drag and drop the view to another position. Save the change.
- If you want to rename the view, just click its name and rewrite it. Save the change.
- If you want to delete the view, click the bin icon. Save the change. The delete option is not available for shared views created by another users unless you are administrator.
Share Views

- Set columns and filters on a list as required (see below). Then, click the add/save icon.
- User has the option to mark the Share With All Users check box. Mark it and confirm your choice by clicking Save as New.
- If the user marks the check box and saves the view, this view will be available for all other users. For better orientation, this shared view will have the share icon or even the picture of the user if the photo is related.
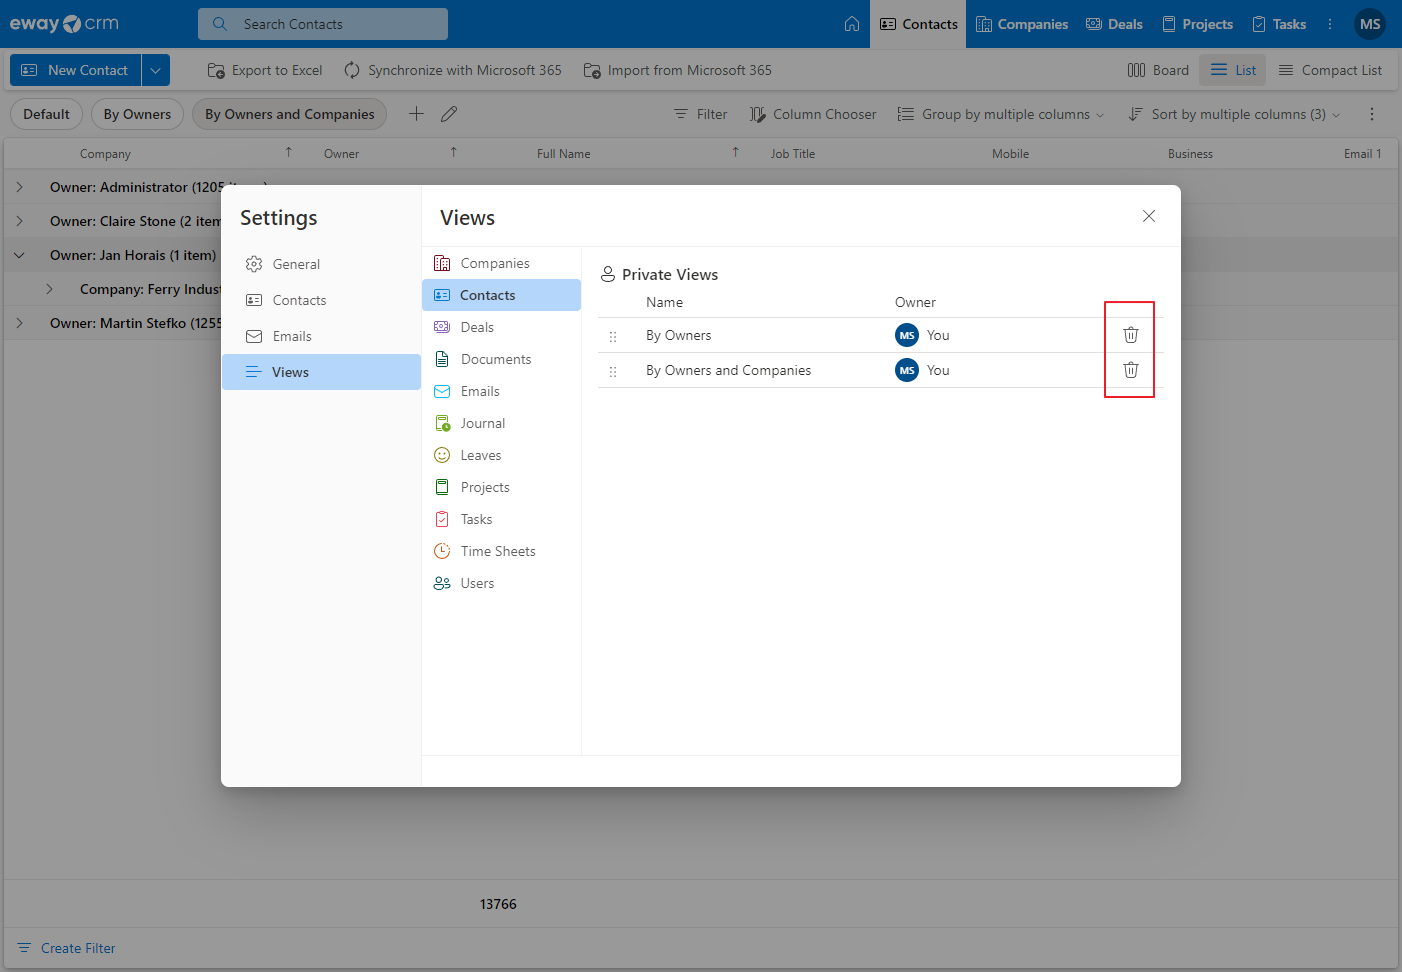
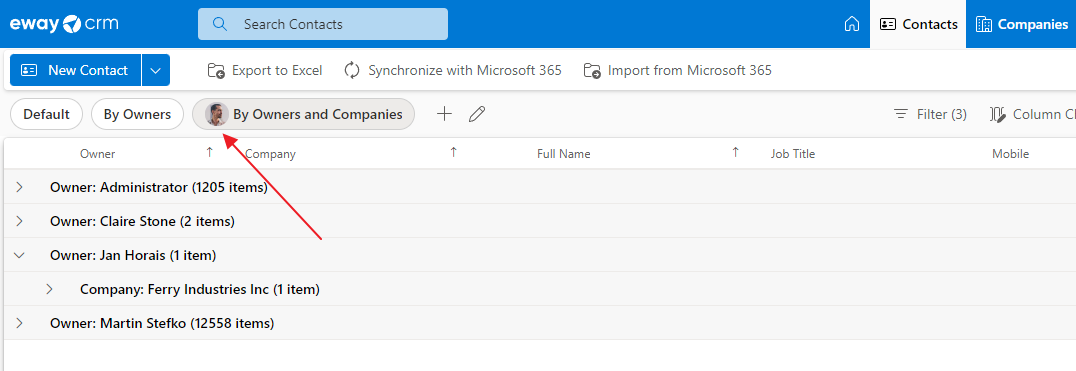
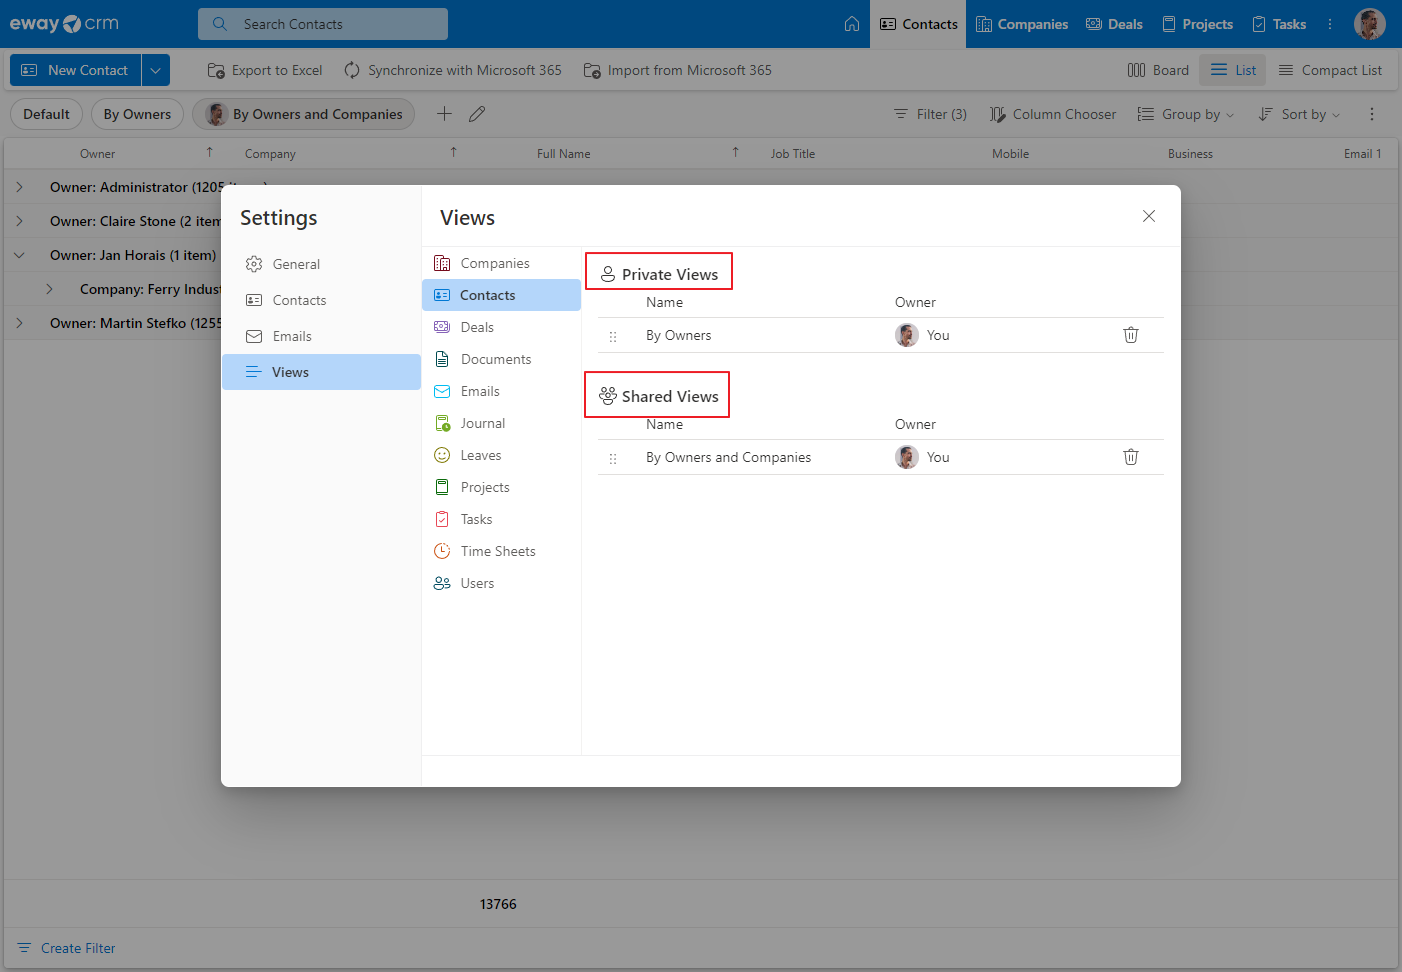
- If you wish to see all available user views, click the pencil icon next to views.
- In the list of views, there are two categories – Private Views and Shared Views. Users can edit views in both categories, but only their own in category Shared Views.

Adding and Removing Columns
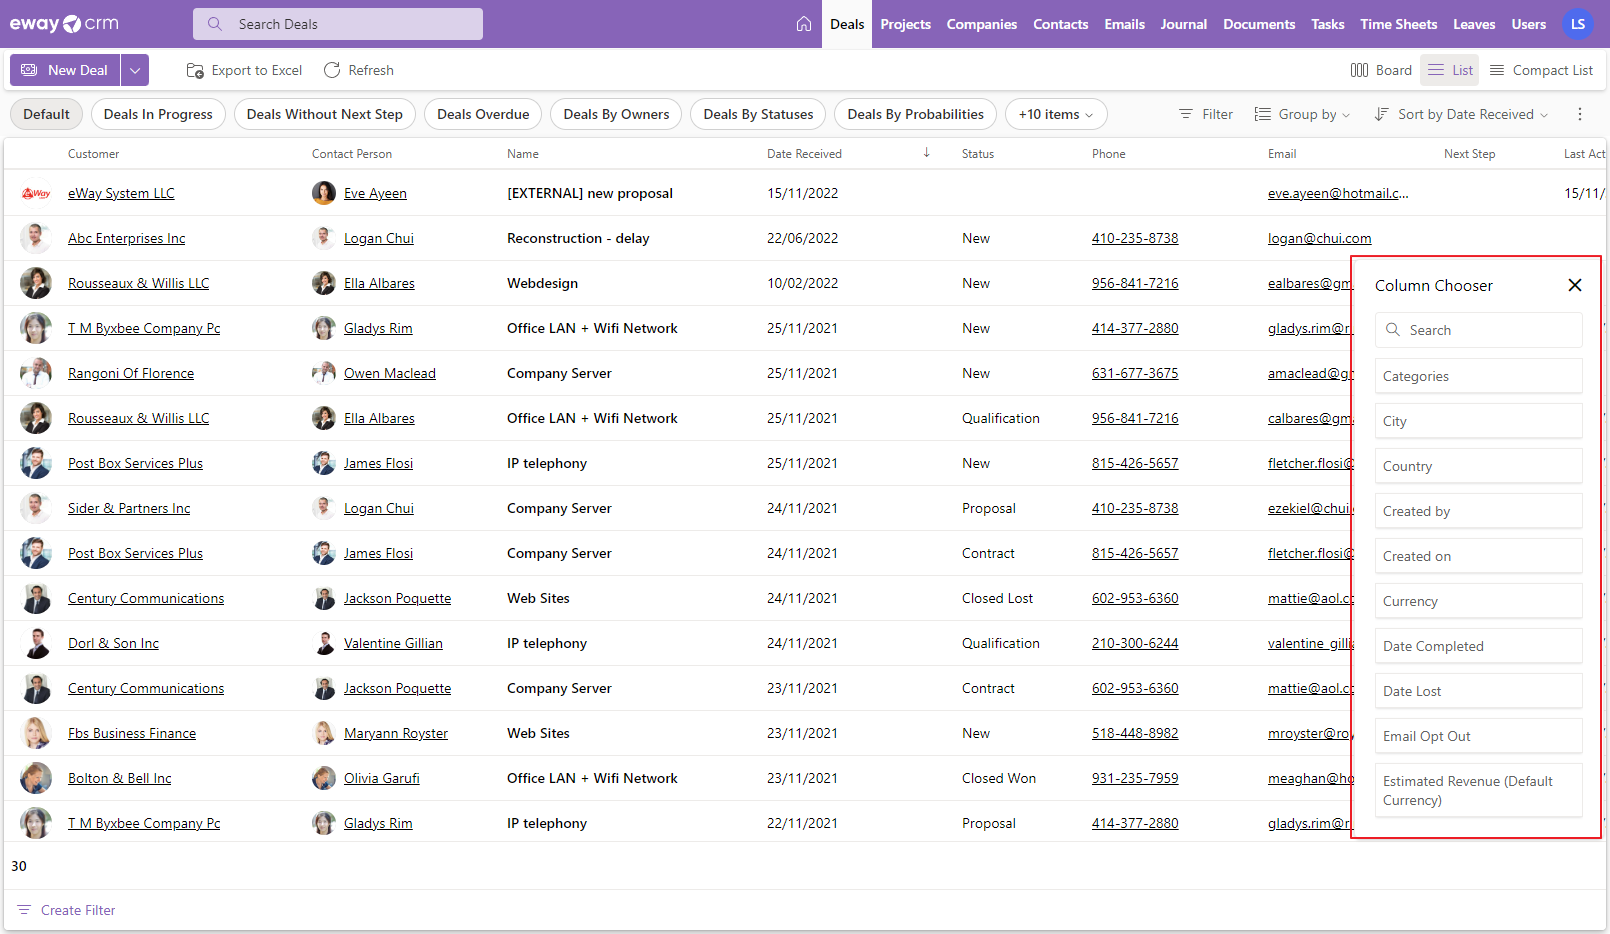
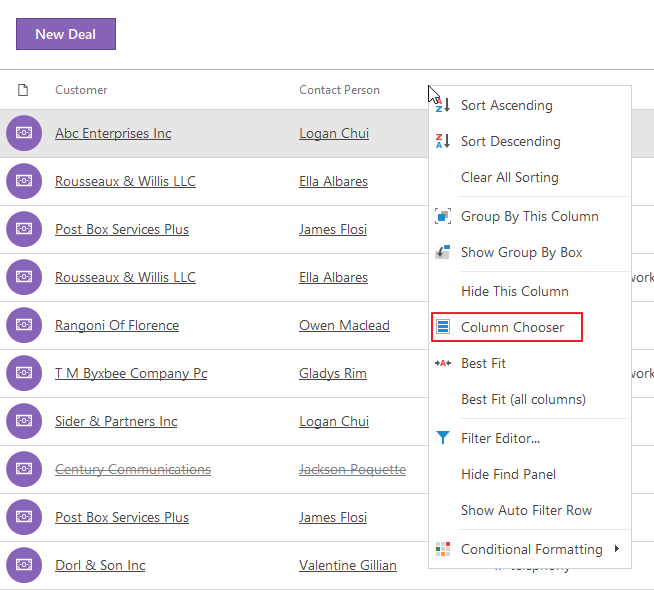
- To add a column, right click on any column heading and select Column Chooser.
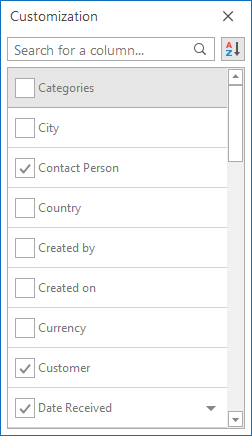
- A list of all available additional fields (including custom fields) for this module will appear. Click the column you want to use from the customization module to the column headings.
- To remove a column from the list, right-click its header and select Hide This Column.

Sorting Items
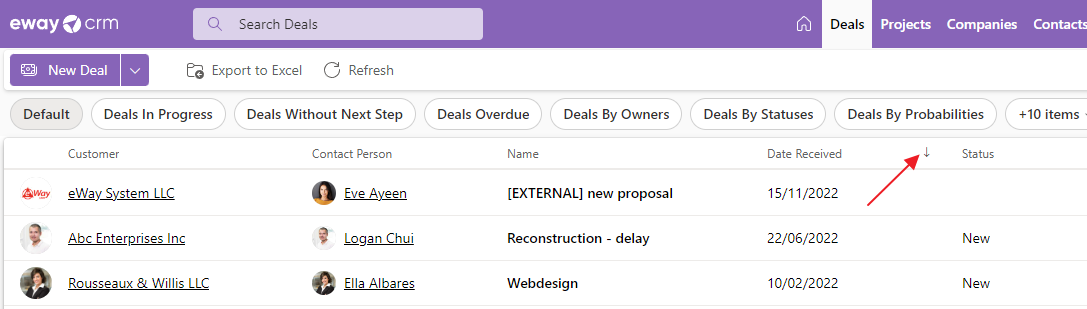
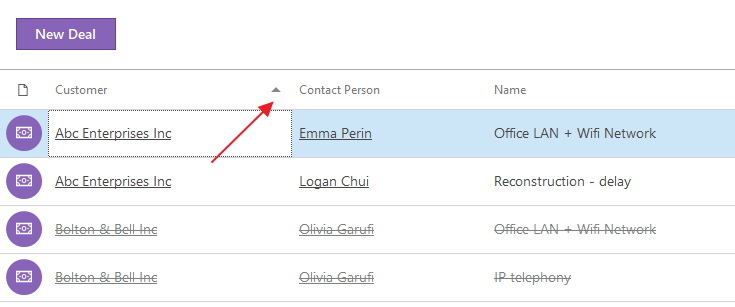
Items in a list can be sorted by values in any column. You can sort them by clicking the column heading. Items can be sorted in ascending or descending order.
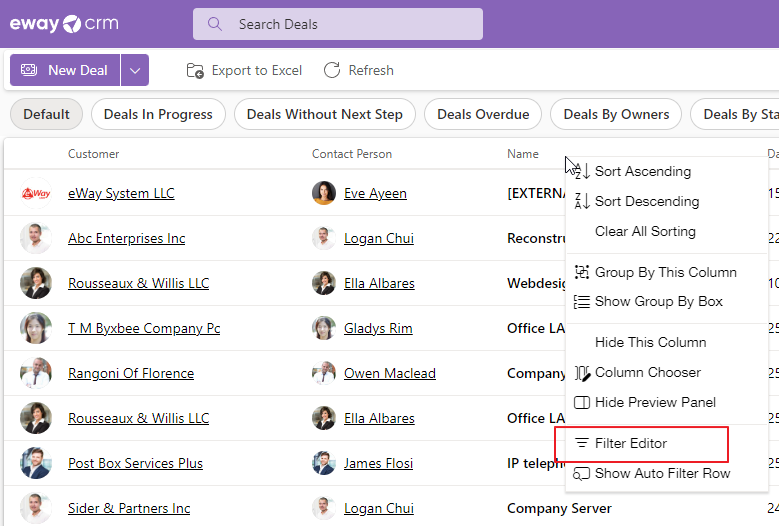
Filters
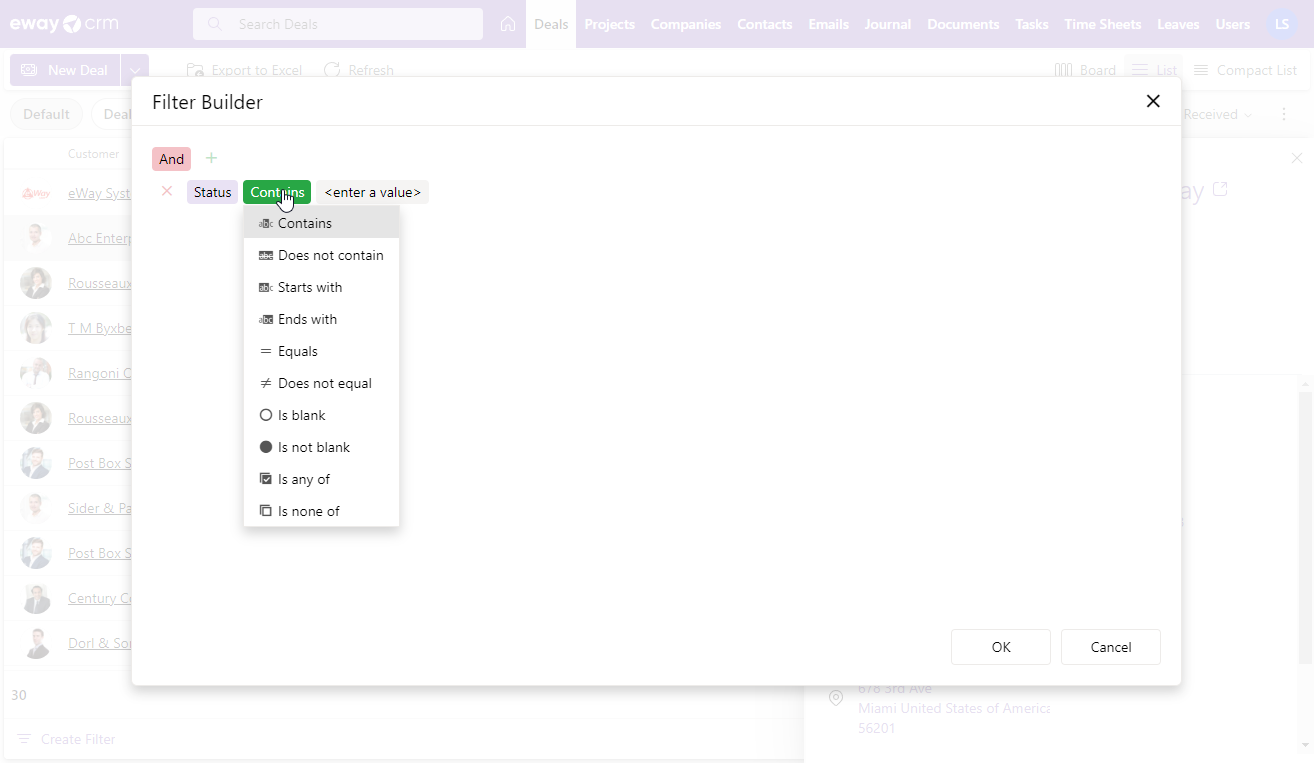
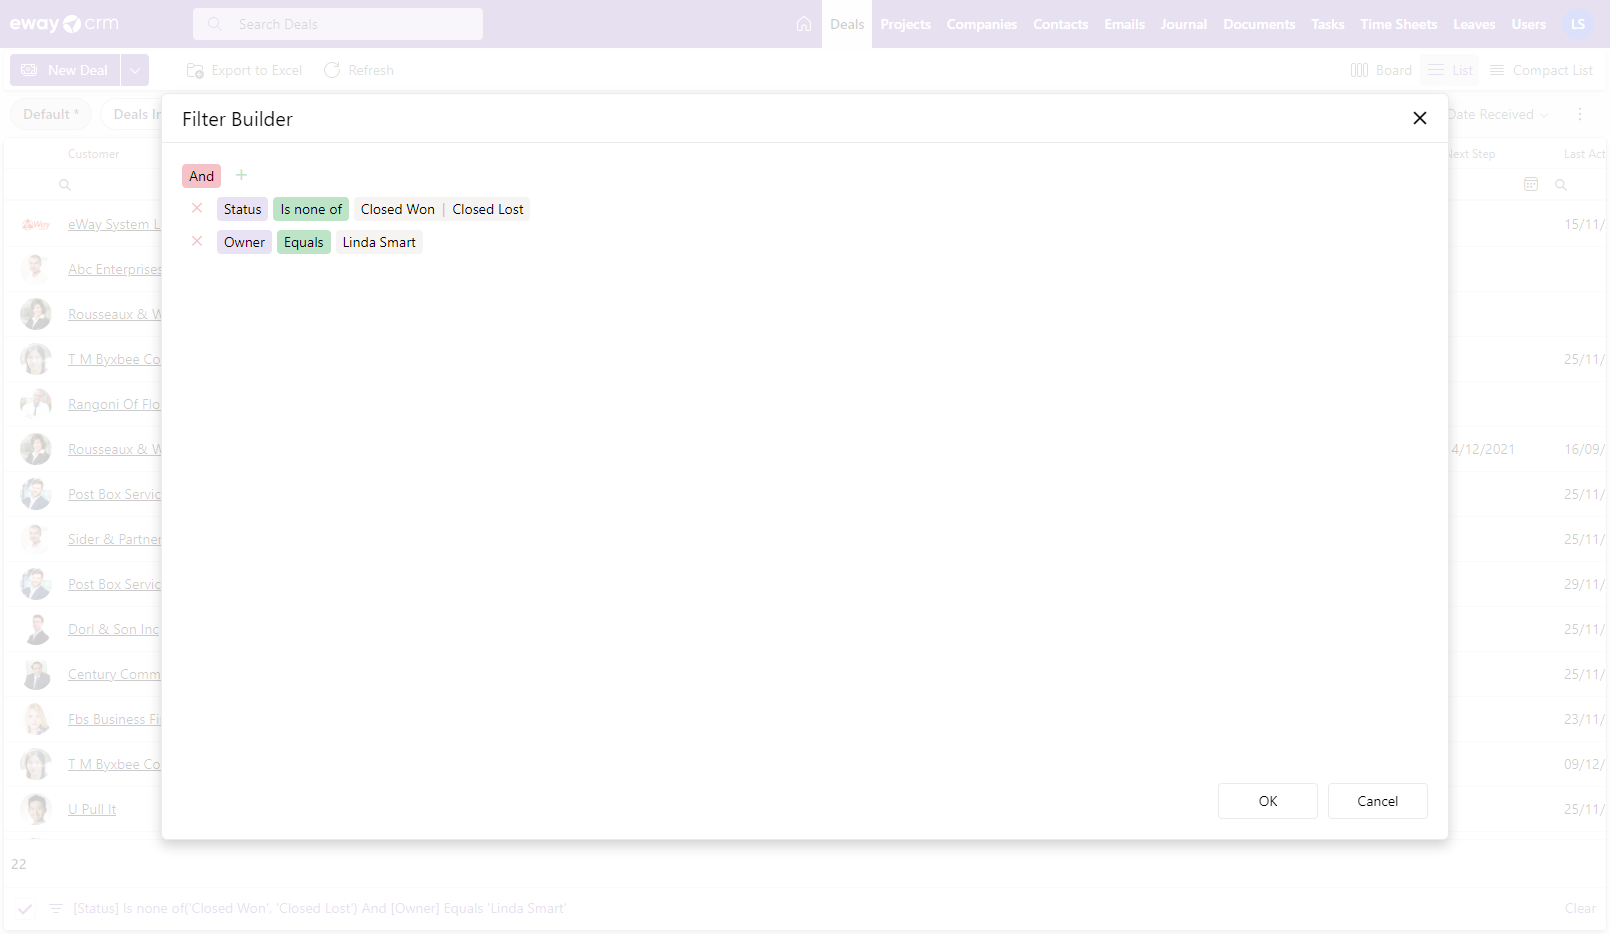
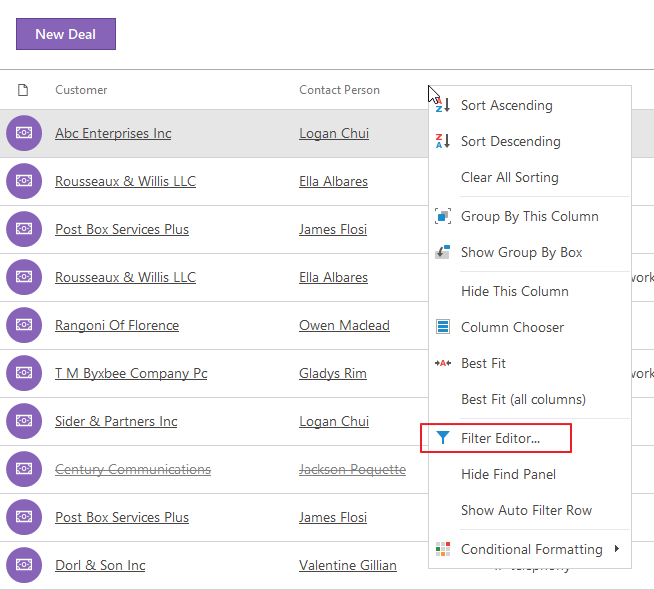
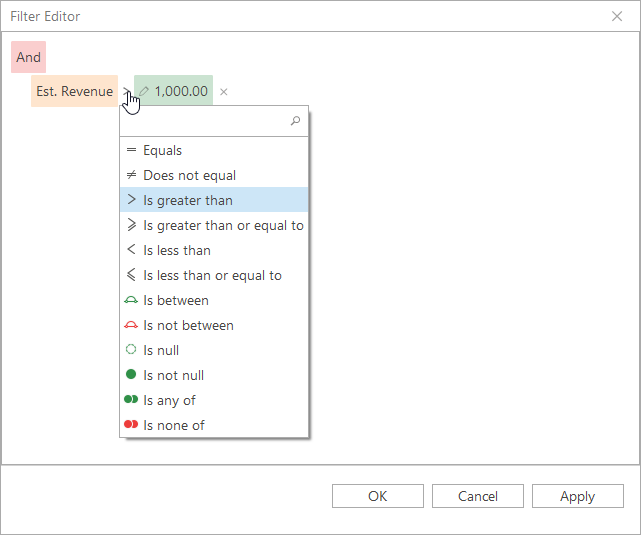
- Right-click on any column heading and select Filter Editor from the context menu.
- In the Filter Editor, you can create advanced conditions similar to Microsoft Excel. You can filter any column using various operators.
- You can also add more than one condition by clicking And in the left-upper corner of the Filter Editor. The + icon after And in the upper part of the Filter Editor window allows you to add another condition.
Quick Search
You can search easily among the items displayed in the list using the search panel in the right top part of the list.

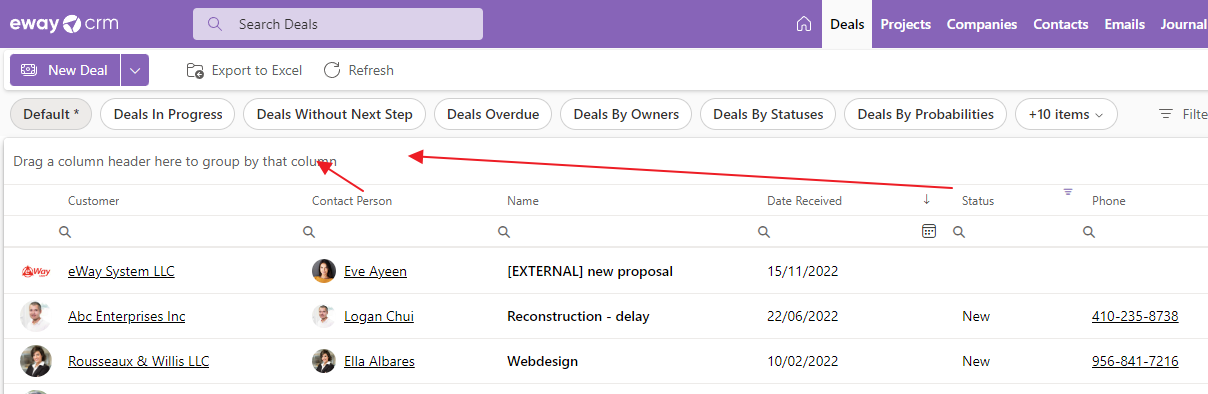
Grouping of Items
Items in the list can be grouped by any column.
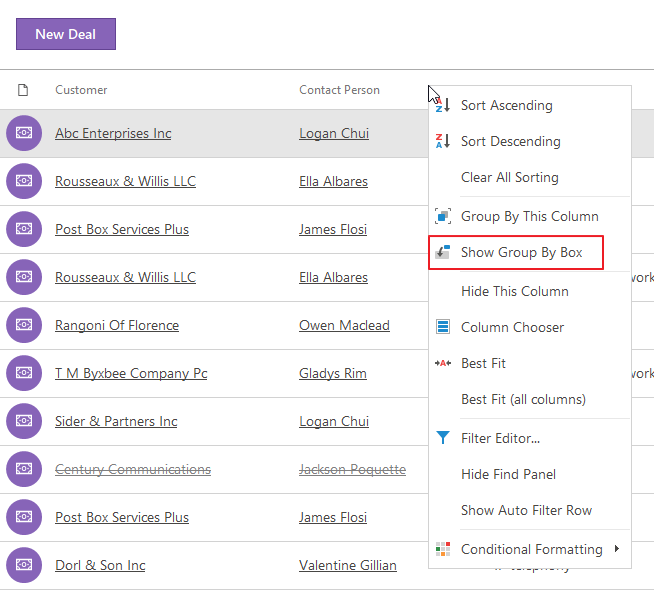
- Right-click the column heading and select Show Group by Box in the context menu.
- The Grouping area will appear above the column heading. You can drag the columns which you want to group into this area. Simply drag and drop one or more columns here.

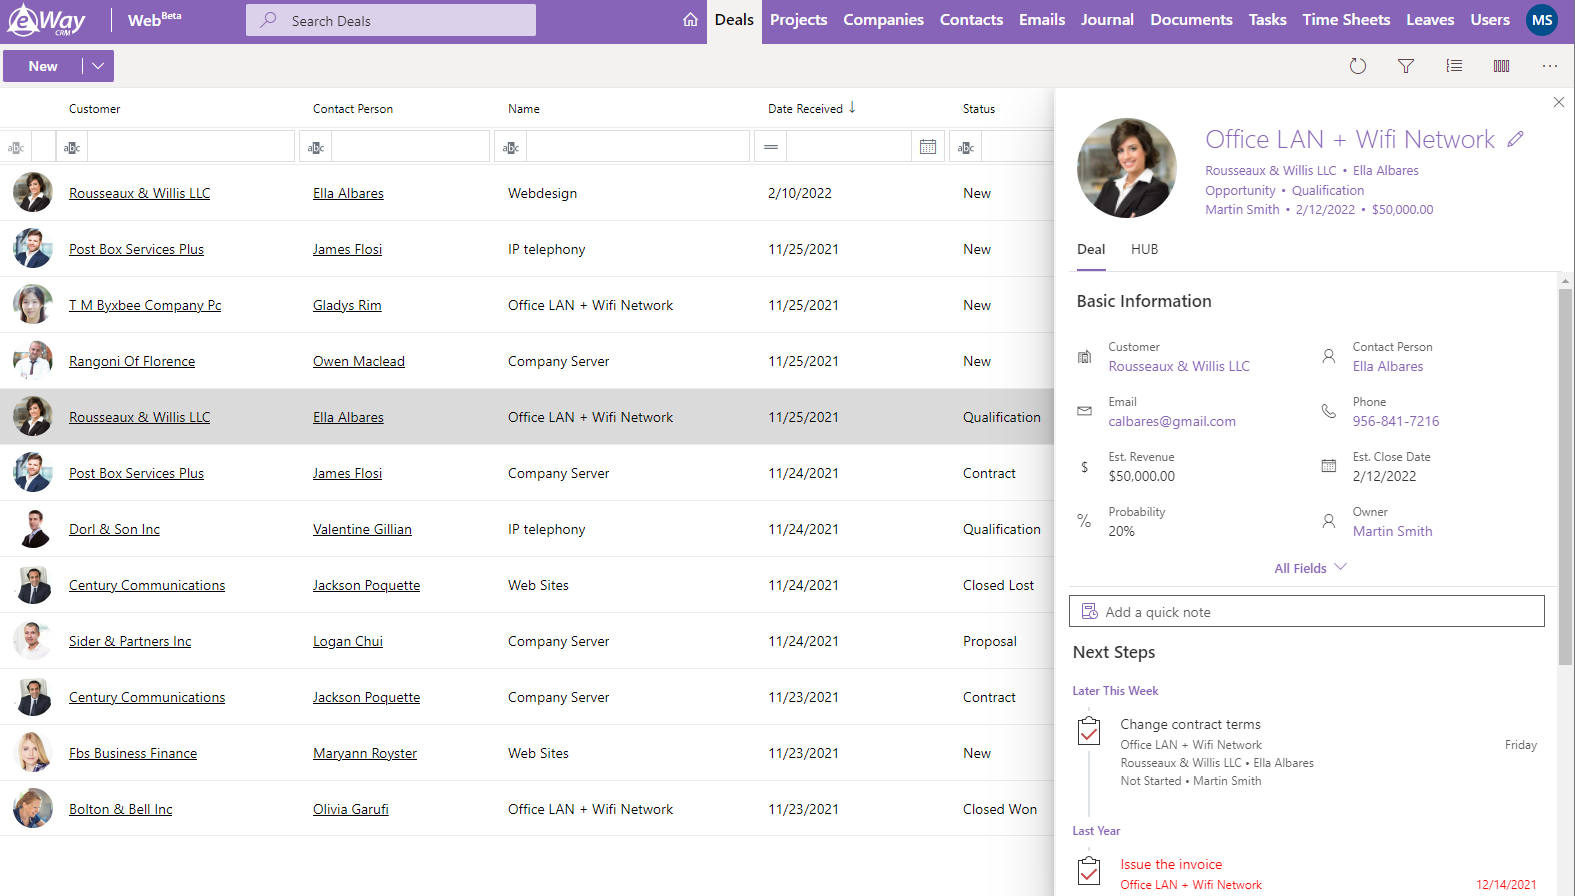
Preview Panel
- If the preview panel is turned on, always when you click some item in the list, you will see side panel:
- In the top part of the preview panel, you can click the icon for editing the item or for closing the panel.
- In the General tab, you will see values of this item.
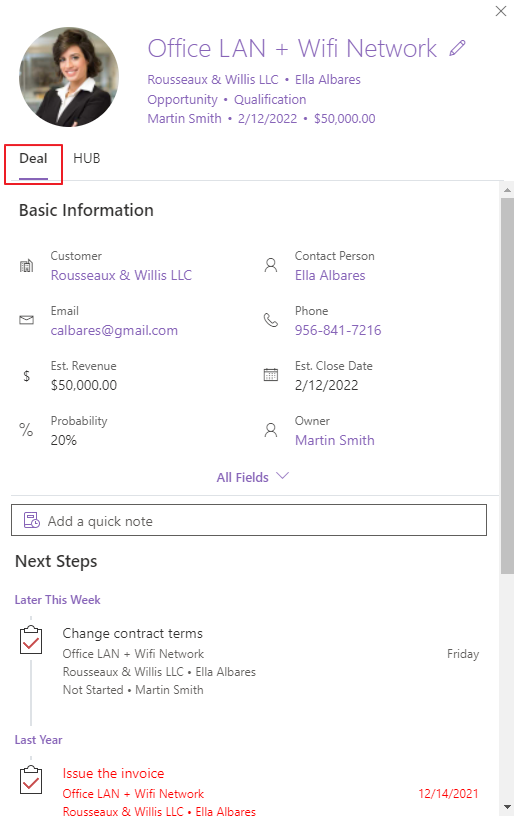
- In the HUB tab you can see tasks, calendar events, journals, documents and emails order by date and time. If you click some item in the HUB, its detail will be opened.
- HUB can contain a lot of items so you can use search field.


eWay-CRM Desktop
- Save Views
- Share Views
- Adding and Removing Columns
- Sorting Items
- Items Filtering
- Quick Searching
- Grouping of Items
Save Views
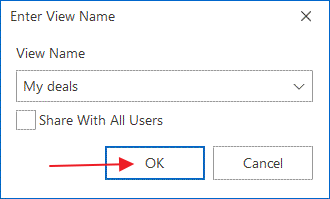
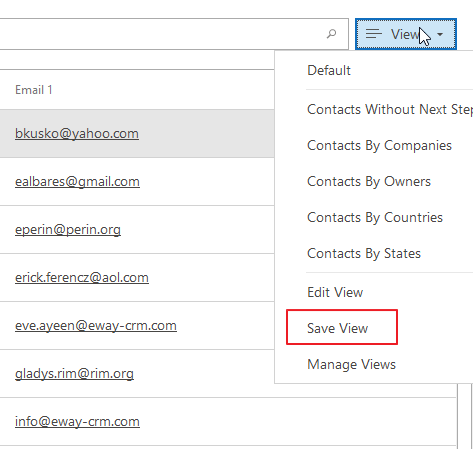
- Set columns and filters on a list as required (see below). Then, click the Views button and select Save View.
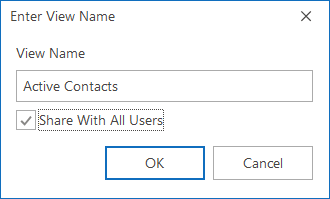
- Name the view as you need and save it by clicking OK.
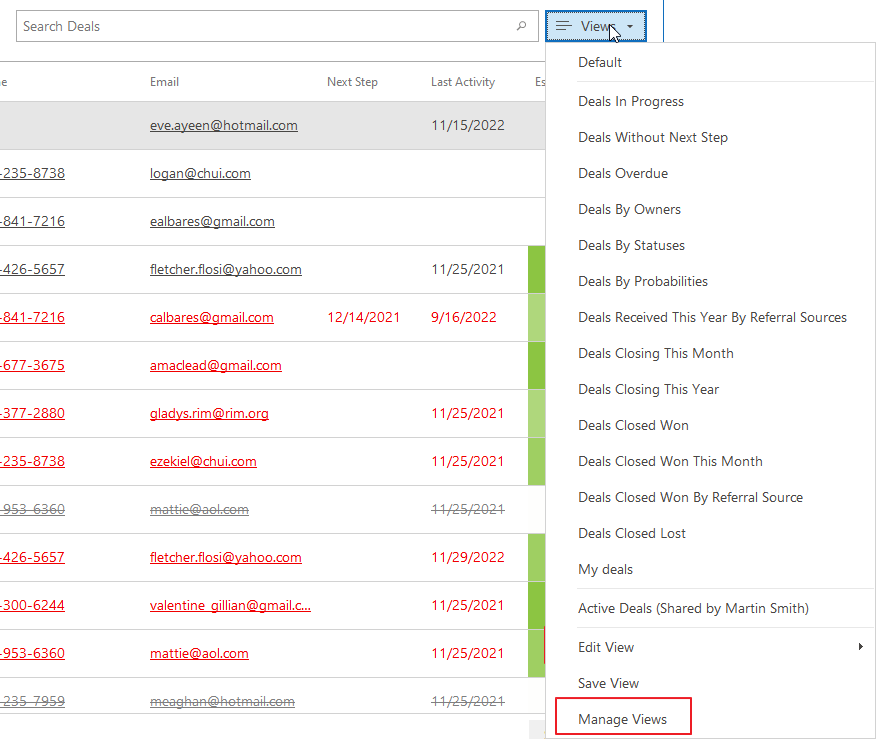
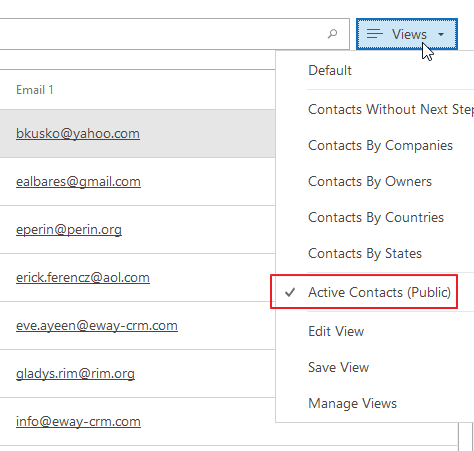
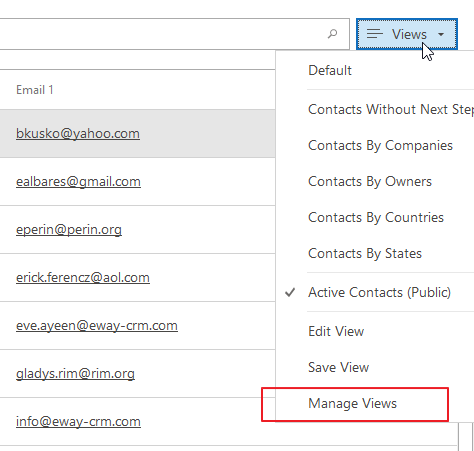
- The view is saved and is available only for you. If you want to see all views and manage them, click again on the Views button and select Manage Views.
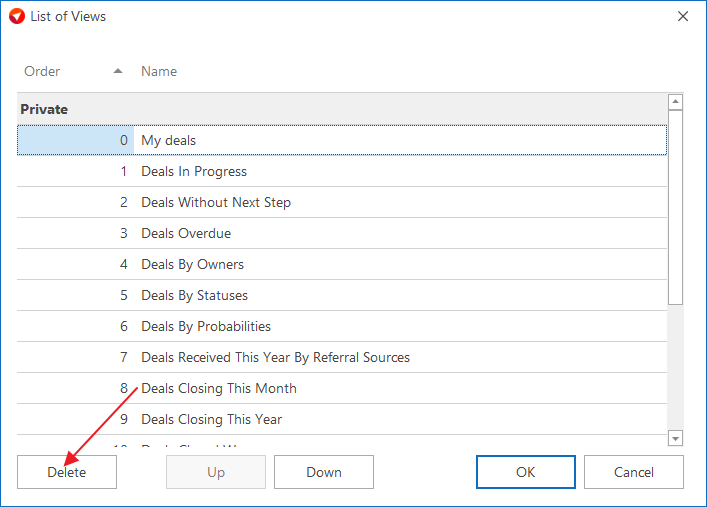
- If you want to delete the view, click Delete. Save the change by clicking OK. The delete option is not available for shared views created by another users.
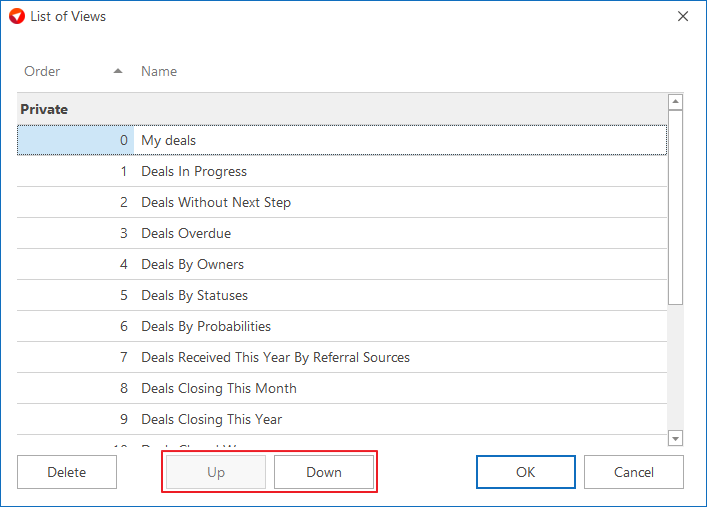
- You can move views in the list. Just, click Up or Down and drag and drop the view to another position. Save the change by clicking OK.
Share Views
User has the option to share views with other users to be sure that everybody can see the lists with the same columns and filters.
- Set columns and filters on a list as required. Then, towards the bottom of the grid report, click the Views button and select Save View.
- User has the option to mark the Share With All Users check box. Mark it and confirm your choice by clicking OK.
- If the user marks the check box and saves the view, this view will be available for all other users. For better orientation, this shared view will have (Public) suffix next to the name.
- If you wish to see all available user views, click again on the Views button and select Manage Views.
- In the list of views, there are two categories – Private and Public. Users can edit views in both categories, but only their own in category Public.
Adding and Removing Columns
- To add a column, right click on any column heading and select Column Chooser.
- A list of all available additional fields (including custom fields) for this module will appear. Drag and drop the name of the column you want to use from the customization module to the column headings.
- To remove a column from the list, just drag it away from the column heading.
Sorting Items
Items in a list can be sorted by values in any column. You can sort them by clicking the column heading. Items can be sorted in ascending or descending order.
Filters
eWay-CRM allows you to work with filters.
- Right-click on any column heading and select Filter Editor from the context menu.
- In the Filter Editor, you can create advanced conditions similar to Microsoft Excel. You can filter any column using various operators.
- You can also add more than one condition by clicking And in the left-upper corner of the Filter Editor. The + icon after And in the upper part of the Filter Editor window allows you to add another condition.
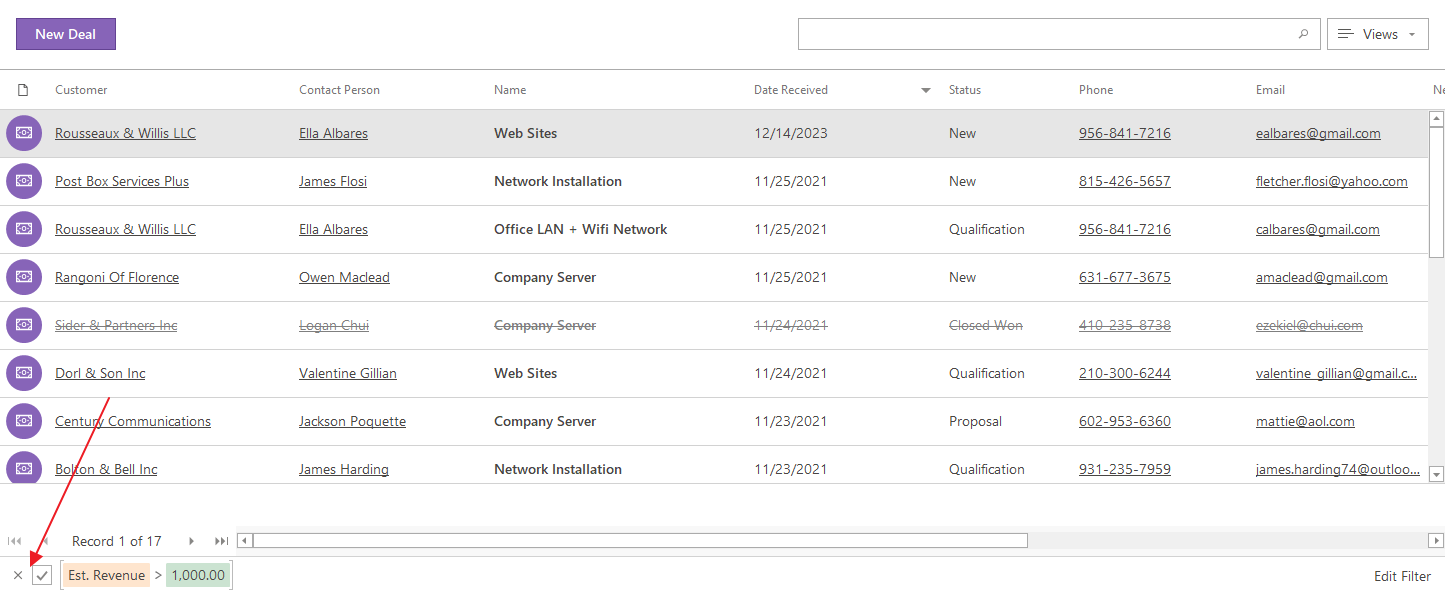
- You can easily remove filters. Just go to the bottom of the list and unmark the check-box – the filter will not be applied anymore but is still saved. Mark it and it is applied again. If you click X, the filter will be completely deleted.

Quick Search
You can search easily among the items displayed in the list using the search panel in the right top part of the list.

Grouping of Items
Items in the list can be grouped by any column.
- Right-click the column heading and select Show Group by Box in the context menu.
- The Grouping area will appear above the column heading. You can drag the columns which you want to group into this area. Simply drag and drop one or more columns here.
eWay-CRM Mobile
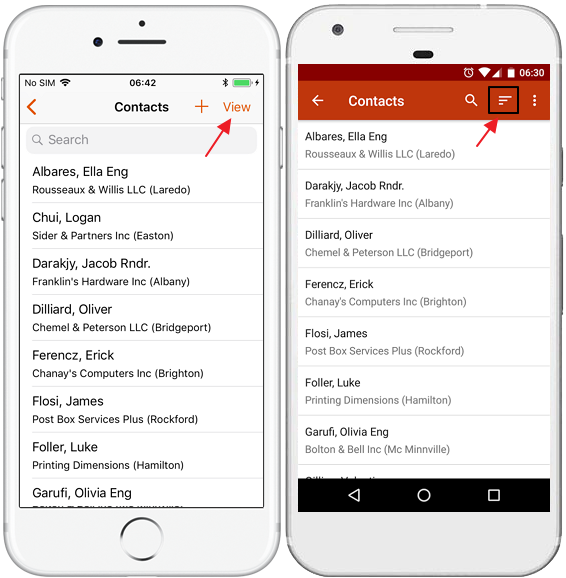
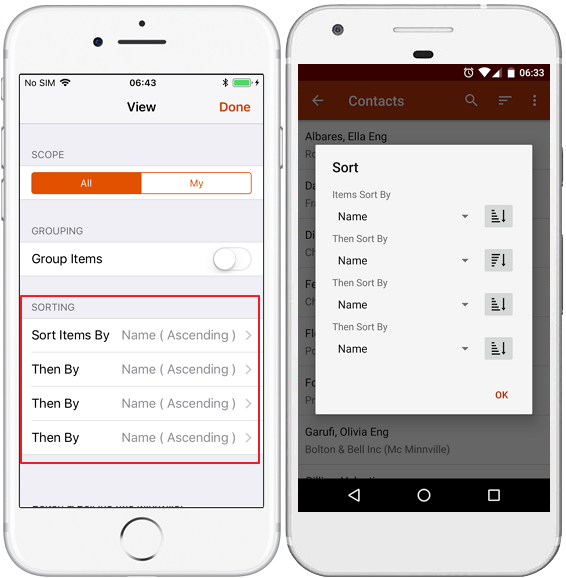
Sort Items
- Default sort in lists is by Name but you can sort items by different fields:
- There you can select up to four levels for sorting of items in the list (you also set whether you want to sort in descending or ascending order).
iPhones: Tap View in the right top corner.
Android phones: Tap sort icon in the top right corner.
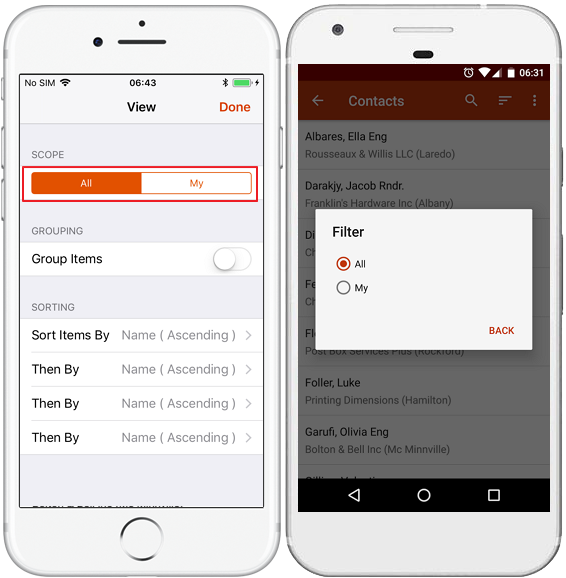
Filter Items
- You may want to filter items in the list by their ownership or status. To do that:
- Filters will be available:
- There are different filters available depending on the module. For more information, go to our documentation. eWay-CRM Mobile will remember your choice and will offer it to you later on until you change it.
iPhones: Tap View in the right top corner.
Android phones: Tap three dots in the top right corner of the screen and select Filter.
iPhones: In the top part of the screen. You tap your filter and tap Done.
Android phones: In the new window where you just select filter you want to apply.
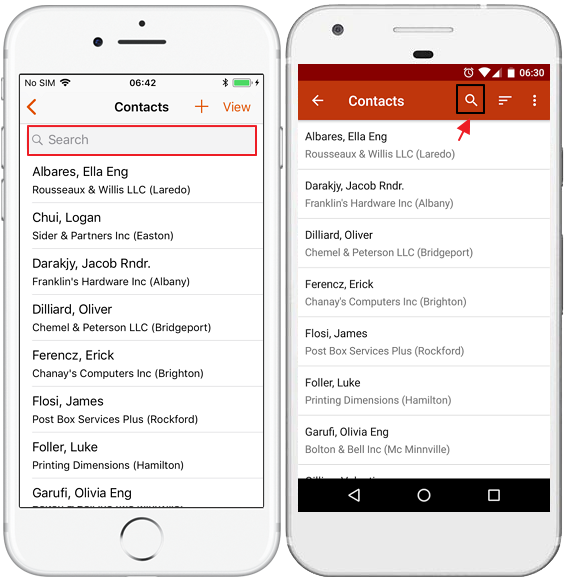
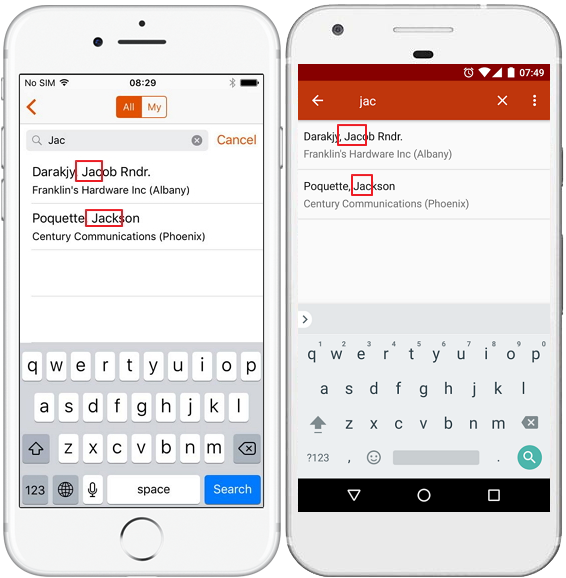
Search Items
- To find an item, tap the field with the magnifying glass in the top of the screen.
- Start typing the name of the item. Only values displayed in the list of items on the screen will be searched, e.g. name, company and city for contacts.
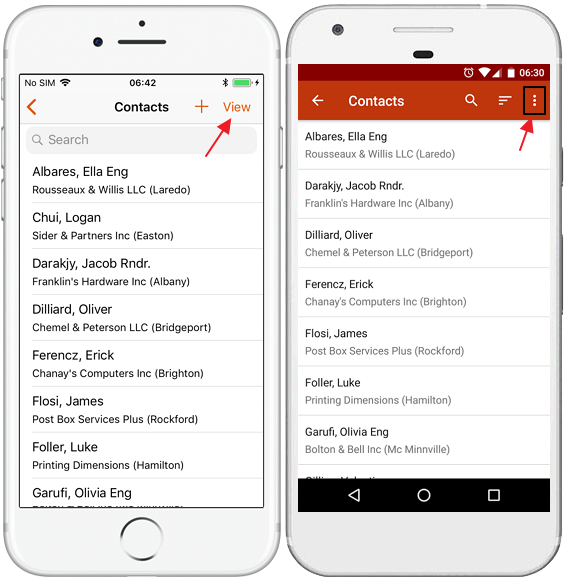
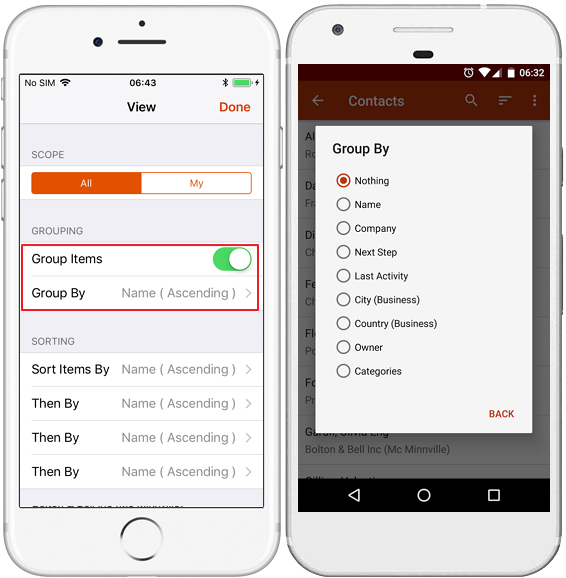
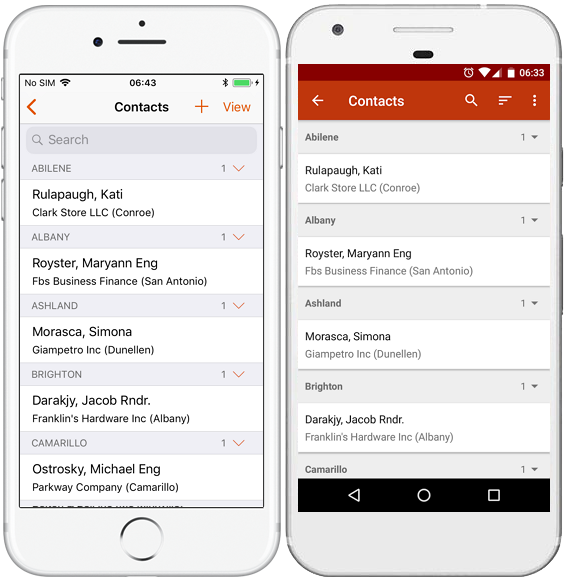
Group Items
- You can group items in the list by different fields:
iPhones: Tap View in the right top corner.
Android phones: Tap three dots in the top right corner of the screen and select Group By.
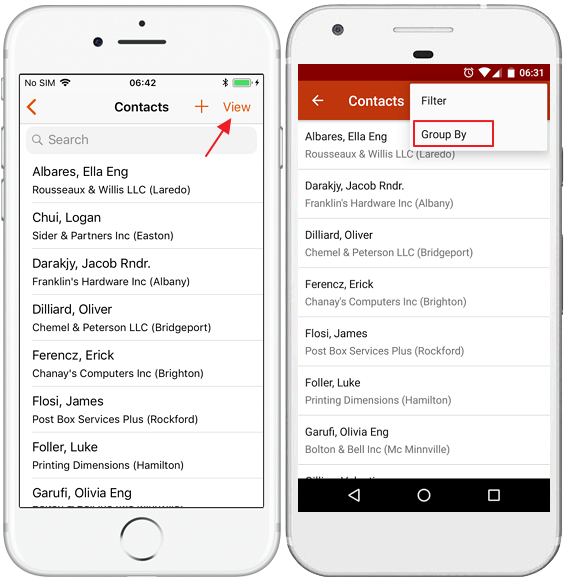
You will see the dialog when you can select by what field the items will be sort:
iPhones: Mark Group Items and select field you want to use for grouping in the Group By field.
Android phones: Select field you want to use for grouping in the dialog.
If you confirm your choice, items will be grouped by the field you choose (e.g. City as in the picture below).
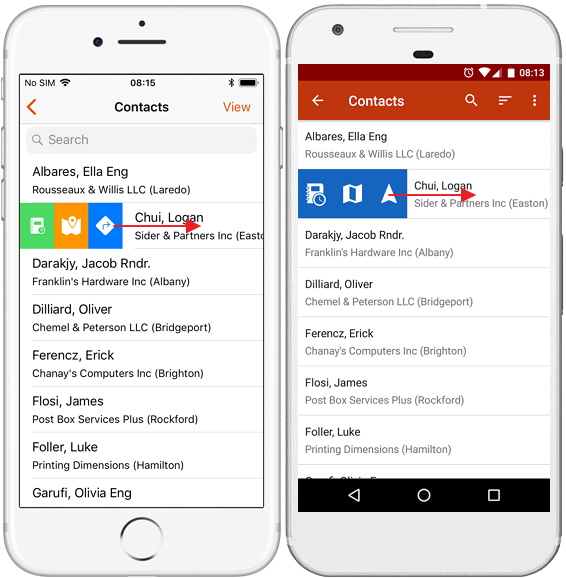
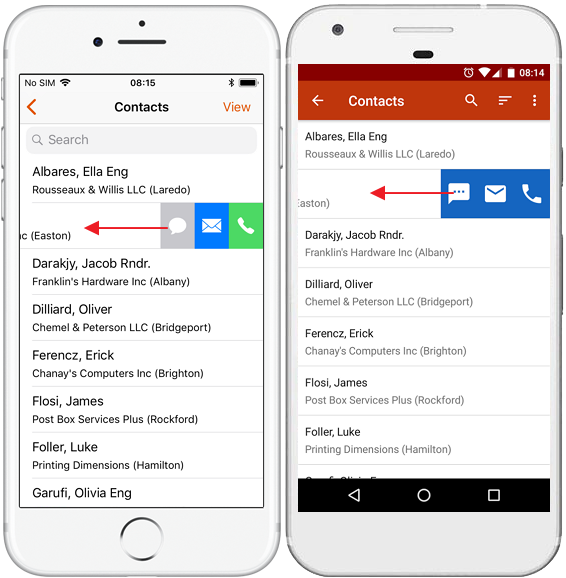
Quick Access Menu
- Each of main modules (contacts, companies, deals and projects) allows you to swipe the item to right or to left and display quick access menu. If you swipe item to the right, you will see options for creating journal and map navigation:
- If you swipe item to the left, you will see options for calling and sending messages:
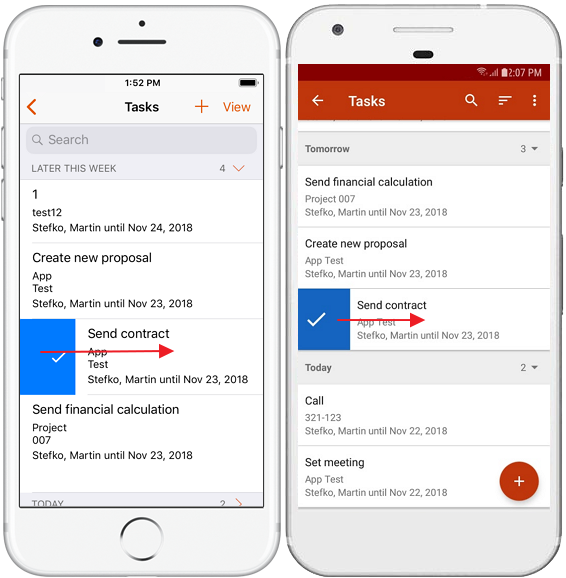
Complete Task in the List
Task can be completed using workflow – you just move the status to Completed when you editing the task. But eWay-CRM has easier way:
- Go to tasks list and find the task you want to mark as completed.
- Tap and hold on the task and swipe to the right.
- Task will by marked as completed.

Was it useful?


